What if you want to cut off LED strip lights?
There are many ways to do that, but they all depend on how you wired them up.
LED strip lights usually come with an end connector wire already attached. But how to connect two different LED strips if there is no connector? Easy, you can simply solder the extra wire to the wire coming out of what will be your "starting" side of LED strip lighting. After soldering these two ends together, cut off any excess wire and either twist or solder whatever's left together.
Customize Your Space With LED Strips
This is a very common way to do so, depending on which style of connector system your strip came with. The reason why we say this is a very common form of connecting wires from different strips together is that it's also one of the easiest for most people as well. Now try doing that again with another set of LED strip lights, but this time, let's say you have a three-strip lighting system.
How to connect multiple LED strip lights in series?
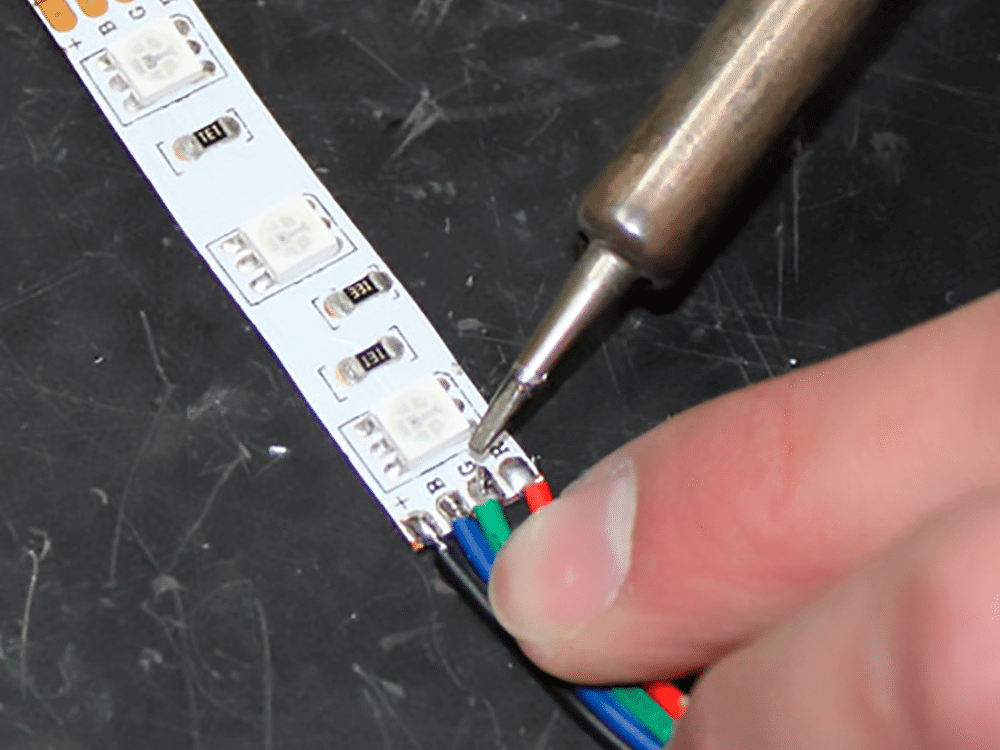
In order to do this, you'll need to cut each LED strip light at the proper spot, then strip off about 1/4 inch of insulation from each wire. Now Tin the stripped wires with a soldering iron and solder them together. Now do the same thing as before by twisting or soldering the remaining wires together and you're good to go!
How to connect LED strip lights parallel?

Connecting LED strips in parallel is a little more complicated than the previous option but can be very beneficial if done correctly. This method is typically used when you want to join LED strip lights from different companies or if one of your strips stops working and you need to add a new strip into the existing connection.
For this example: we'll be using 3M brand LED strip lights, and since they're not soldered together already (depending on where you bought them) we'll have to do it ourselves. We'll start by soldering the proper wire ends together like so:
After that has been done, cut out about 1/4 inch of insulation from each wire and tin the exposed copper with solder like before - usual routine. Now would also be a good time to twist or solder the exposed wires leftover from both strips together; otherwise, you'll have two different sets of LED strip lighting that doesn't know what to do with itself! And, just like before, twist or solder the remaining wires together for a reliable connection.
Can you connect LED strip lights of different brands?
Yes, you can. For this example, we'll use 3M LED strip lights and some cheap Chinese copy LED strip lights.
Like before, cut out insulation 1/4 inch from each wire and tin the exposed copper with solder. Do the same thing as before by twisting or soldering the remaining wires together and you're good to go! Now would also be a good time to twist or solder the exposed wires leftover from both strips together; otherwise, you'll have two different sets of LED strip lighting that doesn't know what to do with itself! And, just like before, twist or solder the remaining wires together for a reliable connection.
Safety aspect while connecting multiple LED strip lights:
When working with LED strip lights, it's important to remember two very important safety tips:
- Always use caution when working with electricity - even if you think you know what you're doing!
- Make sure that your power supply can handle the amount of wattage that your LED strip lights are using. For example: If you have a 12-volt power supply and you're using 24-volt LED strip lights, that's too much draw for the power supply and it will eventually blow.
So always double-check your wiring before turning on the power and be safe about it!
RGB LED strip lights to have another way of connection?
Yes, the RGB LED strip lights to have. RGB means that RGB is a color system consisting of red, green, and blue. In RGB there are many ways to connect the strip light together.
In this example, we will show you how to connect RGB LED Strip Lights in parallel with just one common anode wire.
RGB connects each R, G, B positive wires from different strips together in parallel - in parallel means that positive (+) from every strip goes to the same pole (+), negative (-) from every strip go to the same pole (-). So it would be "+" for all three colors going "up", and at the end - where all these three "+"'s meet there will be your common + (positive).
Another example of an RGB connection is that R, G, B positive wires from different strips go to individual "home run" wires. This way you can cut every color on his own and change the order of it - for example, you connect them in series with all blue first then green then red, but if you need just one color - then just reveal that wire and change the power supply polarity (+/-). In this case, "+" would be common for each color going to a "+".
To sum up, both ways have + side called "home run" or "+". And there will always be a common anode which is a "-". And remember when everything is clear - do not forget to put a proper fuse between the power supply and strip light!

Other considerations
Limit LED strip lights to 50% brightness when using more than one strip light.
Always check the manufacturer's specifications for your specific LED strip lighting regarding maximum wattage, especially if you are splitting power between different strips of lighting. Find spaces where one can remove sections of LED strip lights without cutting them, creating custom lengths. Or create custom-sized flexible extenders to make up the difference.
If it is necessary to cut down a section of LED strip lighting, first check the wear resistance rating under product specs by either contacting the manufacturer or finding this information on their website. Some manufacturers include color-coded insulation that provides guidelines for proper wire stripping depending upon what type of coating surrounds each strand inside the outer covering. Also helpful is to use a hot glue gun to keep the LED strip light in place while soldering.
When connecting LED strip lights, there are a few different ways that you can go about it. The two most common methods are by using either a series or parallel connection.
How to connect multiple LED strip lights without connectors?
If you have a LED strip light that does not have connectors on it, you will need to solder the wires onto it.
When soldering, make sure that the wires are tinned first. This is done by adding a bit of solder to the end of each wire before you start. It makes the connection much stronger and less likely to come apart.
Once the wires are tinned, use a hot glue gun to hold them in place while you solder them together. Make sure that the glue is not too close to the LED strip light or it may cause damage to it. Once they are connected, test them out to make sure they are working properly. If everything looks good, then seal up the connection with some more hot glue. Be careful not to cover up the LED light itself.
Here is a video tutorial on the entire process:
When connecting LED strip lights, you will need to make sure that you are using the correct type of connection. There are two main types of connections - series and parallel.
How many LED strip lights can be connected to the chain?
Usually, LED strip lights to come in either a 16 or 32-foot spool. If you are connecting more than one strip light, it is best to keep the total length of the chain under 50 feet. If you need to connect more than 50 feet of LED strip lights, you will need to use a series connection. This will allow you to power more than one strip light with a single power supply.
When using a series connection, make sure that the total wattage of all the strip lights does not exceed the maximum wattage rating for your power supply.
You can also use a parallel connection to connect more than one strip light. In this case, make sure that the positive and negative wires are connected in the correct order. The most common way to do this is by using a red wire for the positive side and a black wire for the negative side.
However, if you are using a power supply with more than one color output, you will need to use a different color for each strip light. This can be done by using a connector that has three or four colors on it. When connecting LED strip lights, it is important to make sure that you are using the correct type of connection. There are two main types of connections - series and parallel.

How to connect multiple LED strip lights together: series or parallel connection?
The two types of connections have different benefits and drawbacks.
To maintain better distribution of equal amounts of power use the series connection of multiple LED strip lights. If you need to connect more than one strip light, it is best to use this type of connection so that the strand receives power in the same way throughout its length.
The main drawback with a series connection of multiple LED strip lights is that if one LED strip light malfunctions or fails, all of the other strip lights will go out as well. This could be problematic when used with something important like Christmas lights on your roof.
In contrast, a parallel connection is better for distributing different amounts of power to connected multiple LED strip lights that do not have an equal number of LEDs or watts per foot. The most common example is when you need a shorter strand with fewer LEDs per foot in comparison to a longer strand with more LEDs.
Conclusion
When connecting multiple LED strip lights, it is important to use the correct type of connection. There are two main types of connections - series and parallel. The two types of connections have different benefits and drawbacks. And what is more, now you know how to connect LED lights without connector, so this should not be a problem.
A series connection is better for distributing equal amounts of power equally to multiple LED strip lights, while a parallel connection is better for distributing different amounts of power to multiple LED strip lights that do not have an equal number of LEDs or watts per foot.


