The benefits of using LED lights in your room are well documented. However, some people are still not sure whether to use it or not. One of the main reasons is they are worried about whether LED lights will leave any marks on their walls or not but if you follow these steps rigorously, there should be no problem at all.
In this article, I'll use a common example that could solve most LED light problems: How to stick led strip lights on walls without damaging the paint?
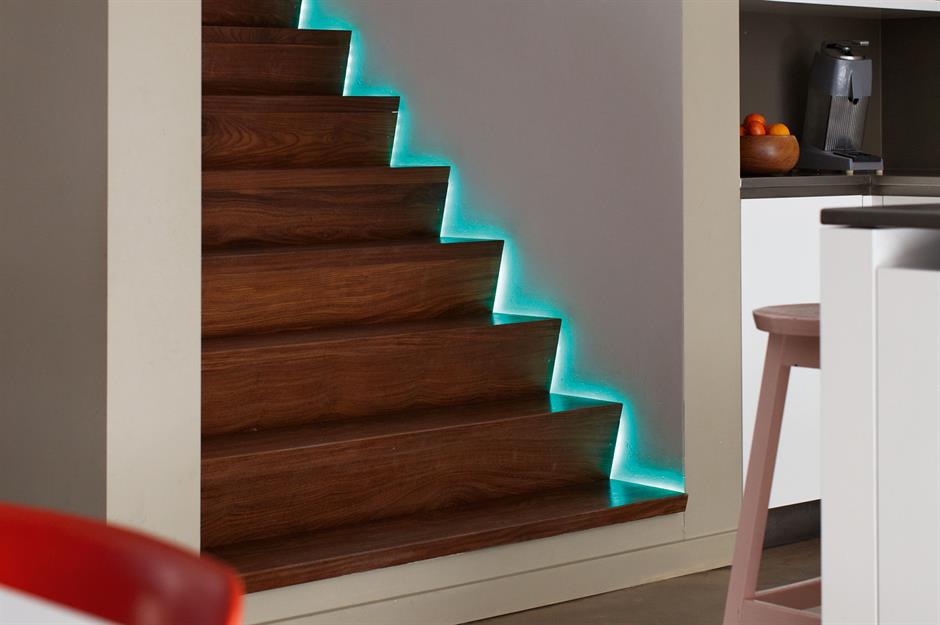
Change The Mood In Any Room With These LED Strips


How to choose the best place for LED strip light?
First of all, you need to find a place where the LED light strip can be stuck without damaging the paint. Usually, this would be on the top of the wardrobe or on a shelf but if you're not sure, use masking tape to test out different places. Make sure the place is dry and clean before hanging up the LED strip lights.
It's not a good idea to put it directly onto wallpaper. If you want, tape up one end of the cable with tape and turn on the light to test if there's any heating problem or flickering after placing/taping your LED strip lights.
How long do you want your strips to be?
This will decide the length and quantity of surface you need for sticking them. Here I have covered a common requirement of 35 cm * 3 meters which are perfect for a small bedroom.
Prepare your led strip light for installation
- Cutting: Before cutting your led light strip, make sure that you've disconnected all things (i.e an extension cord)to avoid an accident; 1-meter shrink tube: cut shrink tube 1-2mm longer than led strip; sandpaper: sand both ends of tubes and 5mm long at each side of RGB joints; 4pcs 22uf capacitor:s solder it in series with the led strip.
- The strip of wood or metal: Cut a strip of wood 35 cm long and 3 cm wide. You can also use a metal strip but make sure that it is not covered in paint or it will be difficult to stick the LED strip lights on the wall without damaging the paint.
- Paint scraper: This is used to scrape off any paint that is on the surface where you will be sticking the LED strip lights on the wall without damaging the paint. If there is any old adhesive leftover from a previous light, this will also need to be removed.
- Pencil: Draw a line where you want your LED strip light to be positioned on the wall.
- Ruler or tape measure: Use this to measure and mark the height and width of your LED strip light.
- Level: Make sure that your LED strip light is straight by using a level.
- Screwdriver: If you are using screws to attach the LED strip light to the wood or metal, then you will need a screwdriver.
- Drill (optional): If you are using screws to attach the LED strip light, then you will need to drill pilot holes first.
- Jigsaw (optional): If you are cutting your own piece of wood or metal, then a jigsaw can be used.
- Cordless drill/driver with screwdriver bit: This can be used as an alternative to a screwdriver.
- Circular saw (optional): If you are cutting your own piece of wood or metal, then a circular saw can be used instead.
Installation process
- Decide where you want to put your LED lights on the wall. It is best to use a level to make sure that the LED lights are straight. If you are not comfortable drilling holes in your wall then you can also screw them to the ceiling. You can see I have done that in my example below.
- Now it is time to measure the length of the LED light strip needed for your project. Make sure you make a note of the beginning and endpoint of your measurement so you know where to shut off the power when you are finished wiring them up. If using more than one LED strip, remember their total combined length has to be equal to or less than 3 meters (you can't join multiple strips together).
- Once all measurements are complete--and if possible, with help from another person--start marking out holes on your wall in pencil with each measuring mark being 20cm apart in line with where you want your LED light strip to be placed. Please note that you will have to drill, cut or screw your chosen material in line with the pencil marks you just made.
- We would strongly recommend drilling a pilot hole first if possible before using a jigsaw or circular saw for cutting holes into your wall as large as the LED strip fitting--this should help minimize fraying and cracking of drywall/plasterboard surfaces around the edges of each hole you make. One may use a jigsaw because it's easier and faster compared to using a circular saw which was my original plan but these tools can be substituted depending on what works best for you! Make sure you wear safety goggles while working with power tools.
- Line up your strip of wood or metal with the marks you've just made and using a paint scraper, scrape away any paint from the surface until it is completely clean and free from any debris. If your LED strip light has adhesive on the back, then also make sure that this side is facing the wall and not the wood/metal.
- Apply a thin layer of silicone sealant to the back of your LED strip light(s) before sticking them onto the prepared surface--this will act as an extra waterproofing barrier. Wait at least 2 hours for the silicone sealant to dry completely before plugging in your LED lights.
- Turn off all power to your circuit at the breaker box before connecting your LED light strip(s)--you can now plug them in and turn everything back on. You can use an extension cord or power strip to make this job easier for you.
- If you find that the LED lights are not straight after turning them on, then carefully remove them from the wall before rotating each strip of LED lights until they are perfectly straight (use a level if possible).
There you have it! How easy was that? A nice clean finish with no marks left behind on your walls despite having drilled fairly large holes into them earlier--this is thanks to our old friend, the silicone sealant!
How to stick LED strip lights on walls without damaging the paint?
Paint can be damaged when adhering led strip lights to it. However, there are ways around this problem and you can install LED lights without taking the paint off.
There are 2 main problems with sticking standard led strip lights on paint or wallpaper. The first is that the adhesive used to stick them onto the wall will not adhere properly to the paint or coating of the wall and coverings such as wallpaper. The second is that most led strip light laminates use glue which emits volatile organic compounds (VOCs). These VOCs can damage some paints and coverings such as vinyl wallpaper. Avoid using superglue at all costs, it will surely damage the surface.
So how to put up led lights without ruining the paint? Let's see what we can do:
- The first issue is very easily solved by using an alternative adhesive for sticking your provided tape onto the surface you want to stick it onto. Silicone adhesives are perfect for this type of application.
- The second issue is not quite as easy to solve but there are two main solutions: Don't use the adhesive (this makes removing the led strip lights very difficult) or substitute your led strip light adhesive with a PVC-free version.

Both alternatives need more mechanical strength than normal so make sure that the alternative you choose actually works for you if you go down these routes. Always read instructions before applying silicone adhesive and ensure it is compatible with the LED strip light adhesive you intend on using! And don't forget about health & safety when installing these kinds of products!
What if by sticking LED strip lights, your paint was damaged?
If your paint was damaged when sticking the led strip lights on, don't worry! You can just touch up any damage with some paint after the LED strip has been removed. Just remember to use acrylic-based paint since oil-based paints may cause problems for your new adhesive.
You can hide the damaged part with a poster, painting, or mirror. If the LED strip light is not going to be seen, then you don't have to worry about this step!
How do LED strip lights come off?
If you decide that you want to take your LED strip lights off the wall, then it is very easy to do so. What you will need: a utility knife or a Stanley knife, a straight edge (a level is perfect for this), some patience, and a steady hand.
First, cut the adhesive tape on the back of the LED strip light using your knife. Take your time and make sure that you get as close to the LED strip light as possible.
Next, pull off the LED strip light from the wall--this can be a little tricky but if you have patience and a steady hand, then you will be able to do it. If the adhesive has been removed completely, then it should come off quite easily. If not, then use your straight edge to help pry it off gently.
Finally, clean any residue left behind on the wall with some hot water and a sponge. If there is any residue leftover, then you can touch up the paint with some acrylic-based paint or just get a new roll of wallpaper!
And that's it! It's pretty straightforward and hopefully, this guide has been useful. Remember to have patience and always avoid using oil-based paints when sticking LED strip lights on painted or papered walls--to be safe, use acrylic-based paint instead!
Final words
Sticking LED strip lights on walls without damaging paint can be a little tricky but with the right adhesive and a little bit of patience, it can be done! Make sure to read instructions carefully and always use acrylic-based paint if you're not sure about the type of paint or wallpaper you have. Have fun with your new LED strip lights!